Monday, November 12, 2012

Mason Jar Pendant Lights

We have 3 pendant lights that hang above our breakfast bar. I absolutely hated the ones that were in place when moved in. All 3 were different colors with a kind of ombre finish and the old white cords were....well not white anymore. The pendants looked like cylinders covered in rock candy! My poor husband was forced to listen to me complain about how hideous these lights were until one day......he bought some new lights! Very nice amber colored pendants with brown cords and a brushed bronze cap piece. 

These looked so much better than what was in place but still wasn't quite what I was looking for so you what I did? Yep. I made my own! I went to a local antique/gift store and picked up 3 of the old blue BALL mason jars. Cut a hole in the lid with some tin snips just slightly larger than the area needed to fit the light socket through. Attach the lid to the wire in place of the old pendant and screw the jar onto the lid. 
              TIP: make sure your light bulbs will fit into the jar


Wrap some star picks around the top for the finishing touch and you've got yourself some beautiful and easy DIY pendant lights.


Thank for reading! Now go get crafty! :)

Laundry Room Sign

This little beauty I whipped up in about 15 minutes. It's just a little decor piece for my laundry room.

I started by finding some vintage laundry images online. I got these over at The Graphics Fairy. I just love them. Then print your images onto burlap by ironing freezer paper to the back and running it through your printer. The tutorial I used for this can be found here: domestically-speaking.com 
I then found a scrap piece of barn wood in the garage along with some old nails salvaged from the same barn and tacked the images up. That's it, easy right?

Hope you enjoyed this project, now go get crafty! :)


Prim Snowman

I thought this little guy was oh so cute. I saw him in Krunpepper catalog and thought to myself "this looks so easy to make" and as it turns out, he was!

First determine the size of your snowman. I choose to make my guy 34" tall because I want to lean him up against a wall. I used some scrap wood that I had lying around in the garage. It's approximately 1/2" thick.


Next draw out your design on your piece of wood. You could blow the picture up and trace it out if you like but I just did mine freehand since it was such a simple design. To avoid wasting materials, it's always best to squeeze any smaller pieces in the waste area of your primary cut.
                                  

Now to make your cuts. I used the jigsaw for this part and I must admit that it is my least favorite of all my power tools. Part of this is due to the fact that I don't own any sawhorses (I know crazy right?) and also because it isn't a stationary base tool, it's handheld. But it is the only tool for the job so.....it is what it is!
   
Make sure to hold your board down, saw flat and watch your fingers! Once you have all of your pieces cut out give the edges a good sanding to make your cuts smooth. I just grabbed a piece of 60 grit sandpaper from the cabinet and stapled it to a block i cut out from a 2x4.
                             

I always recommend painting all pieces before attaching anything together if the pieces are going to be different colors. For me it's just easier this way because I don't have to be so careful. So gather your painting supplies and get ready! 
                     

Once all the pieces have dried you can attach them together. I used 1 1/4in course thread drywall screws simply because that is what I had near by. Attach them from the back using a power drill. Depending on the type of wood you use you might want to pre-drill the holes to avoid splitting the wood.
 

Now it's time to finish painting. I made a stencil of the wording on my computer, printed it out on card stock and cut it out with an exacto knife. I painted the eyes, stars and outside lines before the wording for no particular reason. Once this is all dry use a paint brush to splatter on some antique white paint and you've got yourself a cute prim snowman!

The finished project:


I hope you enjoyed this craft and thanks for reading! Now go get crafty! :)


Saturday, November 10, 2012

Out of sight, Out of mind

All I can say is...WOW! I started this blog in January of this year (2012), made two posts and then....completely forgot about it! I have what I like to call "squirrel syndrome". I am distracted far to easily and very forgetful so when my train of thought derails it's gone for good! That being said, I am making a commitment to this whole blogging thing! 

I have been crafting like crazy, but not taking pictures along the way, so my goal is to go back and try to recreate some of these crafts for my blog so that you can make them also. For those things where this would be impossible I will do my best to paint you a picture with words. I also plan on getting my giant pile of Christmas crafts done before the end of the season so that I can enjoy them this year rather than next and would like to share these with you also. Don't worry I'll be sure to take pics from here on out ! :) 

Monday, January 2, 2012

Barnboard Wainscoting

So I decided that my first official post will be about my husbands most recent project in the house, the wainscoting in the dining room made out of salvaged barn board.

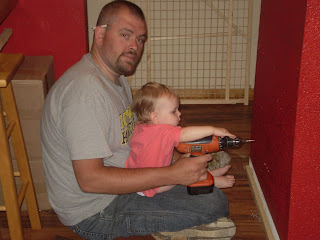
The project begins with Eric and Kaylee prepping the walls with nailer boards. She loves to help daddy when he's working on the house! Eric removed the trim and quarter round and measured up from the floor to the desired height which for us was 36". He used two sets of nailer boards, one at the top and one on the bottom to secure each board to.


Make sure to start at the edge of your wall and work your way around fitting each board as close to the other as possible to avoid having a see through gap. This is a little difficult if you are using reclaimed wood as we did due to the aging and warping of the boards. It doesn't take him long to finish something when he gets an idea in his head. I think the whole project only took about a half a day to complete.


Rather than a simple chair rail to top the wainscoting, he decided to go with a ledge. It's about 2 1/2 inches wide and gives me a great space to display some items.


After all is said and done I think it turned out great! The boards came from a hundred year old barn that a friend was tearing down. Eric = Free labor = Free barn wood  This is great because if you try to buy this stuff it can get pricey and that's definitely not in my budget! I love reclaiming old barn wood to use around the house and you will notice in later posts that it is our "go to" material for many projects.


Sunday, January 1, 2012

Another New Adventure

And so with these words begins another new adventure.....the world of blogging! I've seen many, follow a few, thought it would be interesting and perhaps somewhat therapeutic. I must admit that it is also slightly intimidating when thinking that my thoughts and ideas will be able to seen and judged by so many people that I don't know. Wish me luck!